Here's a sample of why Jupyter Notebooks are so awesome:
It can be very challenging to install, depending on the setup. I tried to make the instructions as simple as possible. This was written on 2018-02-07 ; these installation instructions will probably become out-of-date relatively quickly due to how quickly all the related things are changing.
The best way is, as the jupyter notebook installation instructions recommend, by installing anaconda (http://jupyter.readthedocs.io/en/latest/install.html ; https://www.anaconda.com/download). However, that's more of a python-centric approach that installs a lot of stuff that would only be of interest to python users. if you use python or are interested in python, or in data science, I recommend anaconda. if you just want the jupyter notebook, then the following instructions should work.
https://www.python.org/ > Downloads > 3.6 > if it says "Download for _your operating system here_", then pick the version of 3 (not the version of 2). If it doesn't say your operating system, then go to "View the full list of downloads" and pick the most recent stable version of python 3 for your operating system (don't use 2 unless you need it for something specific).
Follow the python installer. You probably need to be an administrator to install it.
Open the command line. If you're on mac, all the python executables will be in /usr/local/bin ; you can run `/usr/local/bin/python3` to get the interactive python shell ("REPL") - if you spend or plan to spend any length of time there other than just playing around with it, I highly recommend installing IPython.
Inside the python installation location should also be pip/pip3 and maybe some other named versions of pip like pip3.6 (they should all be the same version with symbolic links to the main one). The command to install Jupyter Notebook:
`/usr/local/bin/pip3 install jupyter --user`
It might take a while because there are a lot of dependencies (~40 seconds on a 4+year-old macbook air).
If you installed python 3.6 (which is the current version) on mac, then the executable will be at ~/Library/Python/3.6/bin/jupyter-notebook. all you have to do from there to open the jupyter notebook is run `~/Library/Python/3.6/bin/jupyter-notebook` from the command line; it should automatically open up your default web browser to the jupyter notebook. (it is running a local webserver from the command line.) It is serving up pages from whichever directory you called the command, so you will see files/folders contained within the current directory. To start a jupyter notebook, go to the top-right in the browser window, go to New -> Notebook -> Python 3. This will create a new jupyter notebook in the current directory called "Untitled.ipynb" with a currently-active kernel of python (the kernel can be changed after you install other kernels).
If you're not interested in installing other kernels (so that you can run code in languages other than python), then skip below to the image that shows code executing in a cell.
Kernels can be installed for other languages, for example, R and Scala. I included instructions for installing the Scala kernel because I wrote this for my Programming Paradigms class (this assumes you have already installed Scala):
then install the jupyter scala kernel (a kernel is what allows jupyter to run code in a given language).
as explained on https://github.com/jupyter-scala/jupyter-scala:
on mac/linux:
curl https://raw.githubusercontent.com/alexarchambault/jupyter-scala/master/jupyter-scala > jupyter_scala.bash
bash ./jupyter_scala.bash
then when you run:
`~/Library/Python/3.6/jupyter-kernelspec list`
scala should be in the list of outputs.
then when you reload the jupyter notebook in your web browser, if you go to jupyter notebook menubar -> Kernel -> change kernel -> Scala should appear there.
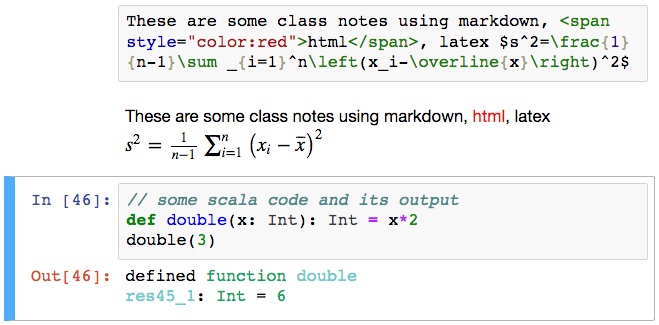
then in a cell you should be able to do this:
type the code in the cell, then either use the hotkey option-return (maybe different off of mac) or shift-return (should be same everywhere). the code is executed and the result is shown in the browser.
some languages have better support in jupyter notebook than others. python's is the best that I know of (jupyter was spun out of the "IPython" project, after all). whereas the python and scala kernels can share variables between cells, the only C kernel I could find required that each cell be its own fully-functional program. python has full documentation integration (put the cursor to the right of the opening parentheses of a function, hold shift and press tab 1-4 times depending on how much documentation you need to see). I haven't gone looking for that in the scala kernel yet.
For scheme/racket: https://github.com/rmculpepper/iracket (it's possible to find more, including the one this one was forked from, but this one has more recent activity and looks easier to install). Walk through the instructions carefully and make sure to install the dependencies. I didn't install ZeroMQ before I installed this, and I either broke my anaconda installation or just thought I did (I rolled back my anaconda from Time Machine before I realized I hadn't installed the ZeroMQ dependency).
there's two modes, edit mode and non-edit mode. in non-edit mode you can use up/down arrow keys to move to different cells. to get into edit mode, hit "enter". to get out of edit mode, hit "ESC". outside of edit mode, hit "h" to see the hotkeys. I think these are the most common ones:
option-return: execute current cell, create a new cell below and move focus to it. in the case of markdown/html or raw cells, execute renders the markdown/html, and execute on raw cells doesn't do anything.
shift-return: execute current cell and move focus to the next cell down (notice that if you're on the bottom-most cell of the notebook, the behavior is the same as option-return where it creates a new cell below)
b: make a new cell below the current one
a: make a new cell above the current one
d, d: delete the current cell (type d, then type d again)
z: undo
c: copy current cell(s)
x: cut current cell(s)
v: paste cell(s)
f: search and replace
s or command-s: save
MODE HOTKEYS:
y: code
m: markdown
r: raw (it doesn't do anything to the text that you enter in these cells)