Postgresql short-circuit evaluation

The purpose of this post is to demonstrate that Postgres follows short-circuit evaluation. That means, if you are checking two boolean values, if you are seeing if one or the other is true, and the first one is true, then you don't need to check the second one, because you know the whole statement is true. For example:

true or true: true; when we see "or", we know that because the first statement was "true", we don't need to check the second statement.
true or false: true; same answer as above, for the same reason. this statement is still true even though the second part of the statement is "false", because the first part is true and it's joined using "or".
Read more Postgresql short-circuit evaluation

Git Tricks

Always remember the difference between "log" and "diff". Log lists commits (optionally showing code changes using -p/--patch), while diff shows the code changes. Log can help you understand changes over time, while diff can help you get a holistic understanding of those changes.

Learning to learn

The first thing to know about git is how to read the manpages. The man pages can be accessed by running these from the command line: "man git", "man git-diff", "man git-log", etc. Note that there is a top-level "git" command (one that doesn't have "diff"/"log"/etc following it), and that it does have its own man page. It introduces all the git commands and the terminology/syntax.

Git Diff

For example, if you know someone implemented a feature but it took them multiple commits, you can use git-log to find the commit just before the first commit to implement the feature Read more Git Tricks

Apple Reminders Tips

Apple Reminders is a bit buggy. If you have a ton of reminders like I do, it can start exhibiting some strange behavior.

If you see a reminder that's missing a description, BE CAREFUL. There's a possibility that what you're seeing is not what's truly there - and in that case, any recent modifications you made to tasks (edits/deletions/marked completions) might have modified the wrong tasks. If you just deleted any tasks, you should hit the undo button to un-delete any tasks that you just deleted. After undoing any deletions, quit Reminders, and reopen it. Hopefully, at that point, things will be correct and you'll be able to proceed as normal. (If you quit reminders after deleting tasks, there's no way to get the tasks back unless you have a Time Machine backup, and even then I'm not sure how to get those reminders back. It would be a big hassle). Read more Apple Reminders Tips

Increasing daily outdoor temperature for the past 3 days

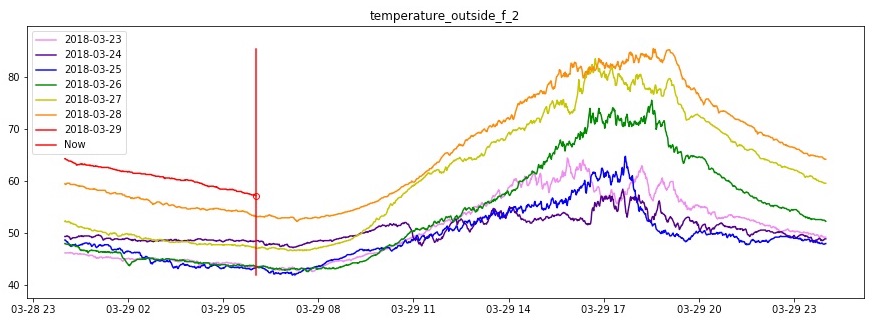
If you know the mnemonic "ROY G BIV" for the rainbow, then this graph should be pretty easy to read. R is red for today, O is orange for yesterday, Y yellow for the day before that, etc (green blue indigo violet). Just start from today and follow your eyes to the left until you reach the border, then mentally pick the next color, then find where that color starts on the right side of the graph. Repeat.

My motivation for this post was that the outside temperature was noticeably higher yesterday than the previous days; it was over 80ºf. I had a feeling my graphs would be pretty interesting - this graph shows that it consistently got warmer each day for the past 3 days.

San Jose, CA outdoor temperature from 2018-03-23 to 2018-03-29.

I haven't seen that on weather sites before! Siri says she can't tell you about past weather.. but that should be even easier than trying to predict the future!

Machine Learning, self-explainability and ethics

Jason Yosinski gives a really good video demonstration of the Deep Visualization Toolbox http://yosinski.com/deepvis (near the bottom of the page). This toolbox allows users to understand how their trained image classification deep neural network is thinking under the hood - not just that it recognizes bookshelves, but all the things that go into recognizing a bookshelf, for example, the edges of the bookshelf and the text on the binding of the books.
Ideas on self-explainability
I think it becomes clearer from this video that the individual neurons in different layers learned things implicitly - like edge detection, text detection, face detection, and then the last layer of the network is basically running classification on the output of the intermediate steps to detect things that are labeled from the labeled images from the image dataset like animals, objects, etc. The idea I have regarding explainability is this: instead of simply having implicit feature detection (where you could then try to manually understand what each neuron is doing by experimentation like in this video), have explicit feature detection by having the final output (or more likely the second-to-last layer) be labels of many things that are tangible, like "fur", "cat ears", "dog tail", "human nose", etc, and then run classification on the output of that layer. It's possible that the network would lose some accuracy, because practitioners' hope with the current system is that whatever features it's learned implicitly (although less understandable to humans) are more expressive for final classification than our explicit intermediate features like "cat ears", but it's also possible that it would keep a similar level of accuracy while also being able to explain itself to humans. But that would be difficult because it would take a lot more effort to label the data - for every bookshelf image you'd have to label it "no cat ears", "no dog ears", etc., and for every cat image you'd have to label "no books", "no book shelves", etc., but images can contain both cats and bookshelves, and cats can be fur-less or tail-less and bookshelves can be book-less.
Ethics, and thoughts on how to improve

I think that using images of current employees of a company as a classifier to determine whether a job candidate would be a good employee is extremely unethical, for multiple reasons. The first and biggest glaring assumption is that current employees are good employees. Another assumption is that there is a correlation between someone's appearance and how good of an employee they are - I think that's inherently flawed, and that there are many outliers who would be heavily-discriminated against based on this model. Another problem (which is one of the main things I hear from the ethics regarding machine learning) is that this re-encodes existing human bias directly into the model and now more-strongly quantifies it in a way that is even more difficult to break. Maybe the current and past hiring managers are biased against a particular ethnic group - then this model would be biased against that ethnic group, and it's likely that no one from that ethnic group would ever be able to break that barrier which is now encoded into a model. If people want to use machine learning to augment the hiring process, they will need to use a vastly different approach than this one. The output should not be "probably a good employee" or "probably not a good employee"; as I said before, it could be something more tangible, like "critical thinker", "team player", etc. - the same things that human interviewers look for in potential job candidates. (Although I have a vague idea about what the output of that model could look like based on the examples I just mentioned, I am not sure what the input would look like - a written essay, a video/audio interview/clip, etc. - but I'm sure all of those have their own problems.)

Additional issues that are inherent to the approach that was mentioned
Another problem with their model is that, assuming that images of their current employees are good indicators of good employees, to train a model you also need training data that contrasts with the positive label, i.e. the negative label, which would be images of people who are not good employees - where does that data come from, who decides that, and how do they decide that? Even if this model could possibly have a chance of working in any conceivable way, they need a lot more data than just images of all the current and past employees to make the model viable, and to get that amount of data they need many people to gather and label that data, and the people who do that work should both be able to judge good and bad employees and be trustworthy to judge based on the metrics they are asked to use to label the data. If someone in a particular group, an ethnic group or any other kind of group, decides that they want to give a leg up to the other people in their group rather than labeling based on good/bad employee status, then the model will behave differently than expected. But if the label-workers do label the data in the way that they are asked, then it starts feeling like the Milgram experiment (Wikipedia).

Jupyter Notebook Introduction and Basic Installation

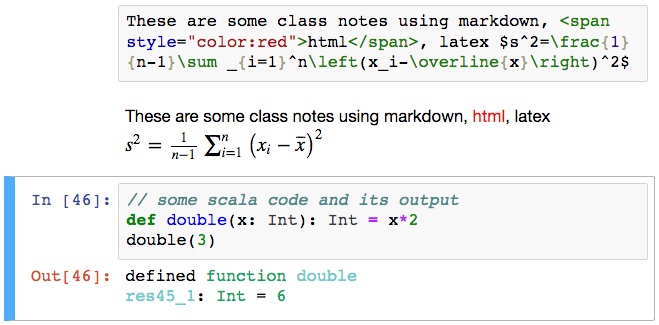
Here's a sample of why Jupyter Notebooks are so awesome:

It can be very challenging to install, depending on the setup. I tried to make the instructions as simple as possible. This was written on 2018-02-07 ; these installation instructions will probably become out-of-date relatively quickly due to how quickly all the related things are changing.

The best way is, as the jupyter notebook installation instructions recommend, by installing anaconda (http://jupyter.readthedocs.io/en/latest/install.html ; https://www.anaconda.com/download). However, that's more of a python-centric approach that installs a lot of stuff that would only be of interest to python users. if you use python or are interested in python, or in data science, I recommend anaconda. if you just want the jupyter notebook, then the following instructions should work.

https://www.python.org/ > Downloads > 3.6 > if it says "Download for _your operating system here_", then pick the version of 3 (not the version of 2). If it doesn't say your operating system, then go to "View the full list of downloads" and pick the most recent stable version of python 3 for your operating system (don't use 2 unless you need it for something specific).

Follow the python installer. You probably need to be an administrator to install it.

Open the command line. If you're on mac, all the python executables will be in /usr/local/bin ; you can run `/usr/local/bin/python3` to get the interactive python shell ("REPL") - if you spend or plan to spend any length of time there other than just playing around with it, I highly recommend installing IPython.

Inside the python installation location should also be pip/pip3 and maybe some other named versions of pip like pip3.6 (they should all be the same version with symbolic links to the main one). The command to install Jupyter Notebook:
`/usr/local/bin/pip3 install jupyter --user`

It might take a while because there are a lot of dependencies (~40 seconds on a 4+year-old macbook air).

If you installed python 3.6 (which is the current version) on mac, then the executable will be at ~/Library/Python/3.6/bin/jupyter-notebook. all you have to do from there to open the jupyter notebook is run `~/Library/Python/3.6/bin/jupyter-notebook` from the command line; it should automatically open up your default web browser to the jupyter notebook. (it is running a local webserver from the command line.) It is serving up pages from whichever directory you called the command, so you will see files/folders contained within the current directory. To start a jupyter notebook, go to the top-right in the browser window, go to New -> Notebook -> Python 3. This will create a new jupyter notebook in the current directory called "Untitled.ipynb" with a currently-active kernel of python (the kernel can be changed after you install other kernels).

If you're not interested in installing other kernels (so that you can run code in languages other than python), then skip below to the image that shows code executing in a cell.

Kernels can be installed for other languages, for example, R and Scala. I included instructions for installing the Scala kernel because I wrote this for my Programming Paradigms class (this assumes you have already installed Scala):

then install the jupyter scala kernel (a kernel is what allows jupyter to run code in a given language).
as explained on https://github.com/jupyter-scala/jupyter-scala:
on mac/linux:
curl https://raw.githubusercontent.com/alexarchambault/jupyter-scala/master/jupyter-scala > jupyter_scala.bash
bash ./jupyter_scala.bash

then when you run:
`~/Library/Python/3.6/jupyter-kernelspec list`
scala should be in the list of outputs.

then when you reload the jupyter notebook in your web browser, if you go to jupyter notebook menubar -> Kernel -> change kernel -> Scala should appear there.
then in a cell you should be able to do this:

type the code in the cell, then either use the hotkey option-return (maybe different off of mac) or shift-return (should be same everywhere). the code is executed and the result is shown in the browser.

some languages have better support in jupyter notebook than others. python's is the best that I know of (jupyter was spun out of the "IPython" project, after all). whereas the python and scala kernels can share variables between cells, the only C kernel I could find required that each cell be its own fully-functional program. python has full documentation integration (put the cursor to the right of the opening parentheses of a function, hold shift and press tab 1-4 times depending on how much documentation you need to see). I haven't gone looking for that in the scala kernel yet.

For scheme/racket: https://github.com/rmculpepper/iracket (it's possible to find more, including the one this one was forked from, but this one has more recent activity and looks easier to install). Walk through the instructions carefully and make sure to install the dependencies. I didn't install ZeroMQ before I installed this, and I either broke my anaconda installation or just thought I did (I rolled back my anaconda from Time Machine before I realized I hadn't installed the ZeroMQ dependency).

there's two modes, edit mode and non-edit mode. in non-edit mode you can use up/down arrow keys to move to different cells. to get into edit mode, hit "enter". to get out of edit mode, hit "ESC". outside of edit mode, hit "h" to see the hotkeys. I think these are the most common ones:
option-return: execute current cell, create a new cell below and move focus to it. in the case of markdown/html or raw cells, execute renders the markdown/html, and execute on raw cells doesn't do anything.
shift-return: execute current cell and move focus to the next cell down (notice that if you're on the bottom-most cell of the notebook, the behavior is the same as option-return where it creates a new cell below)
b: make a new cell below the current one
a: make a new cell above the current one
d, d: delete the current cell (type d, then type d again)
z: undo
c: copy current cell(s)
x: cut current cell(s)
v: paste cell(s)
f: search and replace
s or command-s: save
MODE HOTKEYS:
y: code
m: markdown
r: raw (it doesn't do anything to the text that you enter in these cells)
My Anaconda/Jupyter Setup

This is mainly for myself so that I could rebuild my setup from scratch, but it would be nice if anyone else can benefit from it!

This is incomplete. I have class in 30 minutes. But this should have the majority of the information necessary for me to complete this post. Some of this information or these urls may even be repeated here...

https://www.anaconda.com/download/ - it will automatically detect your operating system

note: when installing python packages in anaconda, always first try to install using conda, e.g. `conda install somepackage`. if that doesn't work, try googling to find if it can be installed using conda under a different channel, e.g. "-c ericmjl" in "conda install -c ericmjl environment_kernels" (from below). Finally, if those fail, resort to "pip install somepackage".

conda create python=3.6 -n env_name
# source the environment. after sourcing that environment, all installations will go in there.
source activate env_name
conda install -c conda-forge jupyter_contrib_nbextensions
# this is automatically installed as a dependency of jupyter_contrib_nbextensions, so there's no need to install it if installing the other one
# conda install -c conda-forge jupyter_nbextensions_configurator

# ipdb (IPython debugger): from conda, on github
conda install -c conda-forge ipdb

https://anaconda.org/conda-forge/ipython-sql
conda install -c conda-forge ipython-sql

to see which environment the notebook is currently running in:
conda install -c ericmjl environment_kernels
https://stackoverflow.com/a/39070588/2821804
which links to http://stuartmumford.uk/blog/jupyter-notebook-and-conda.html

https://github.com/Cadair/jupyter_environment_kernels
http://stuartmumford.uk/blog/jupyter-notebook-and-conda.html
https://stackoverflow.com/questions/37085665/in-which-conda-environment-is-jupyter-executing

pip install environment_kernels # can this not be done with "conda install" instead?

Good example of a Jupyter Notebook: https://www.kaggle.com/ash316/novice-to-grandmaster/notebook (which analyzes survey results of people who participate on kaggle.com, where Kaggle is "The Home of Data Science & Machine Learning").

Naming Conda Environments so they can be seen from inside Jupyter Notebooks:
http://ipython.readthedocs.io/en/stable/install/kernel_install.html#kernels-for-different-environments
ipykernel should be installed. the url explains how you can install it.
python -m ipykernel install --user --name myenv --display-name "Python 3.? (myenv)"
If you are already in a Jupyter Notebook in that environment, you can reload the page, and go to Jupyter Notebook Menubar -> Kernel -> Change Kernel -> and you should be able to see the kernel you just renamed. (even if you are already in that kernel/environment, the name won't show up until you reload that kernel.